[vc_row][vc_column][vc_single_image image=”261791″ img_size=”large” add_caption=”yes” alignment=”center”][/vc_column][/vc_row][vc_row][vc_column][vc_column_text]
Inspiration
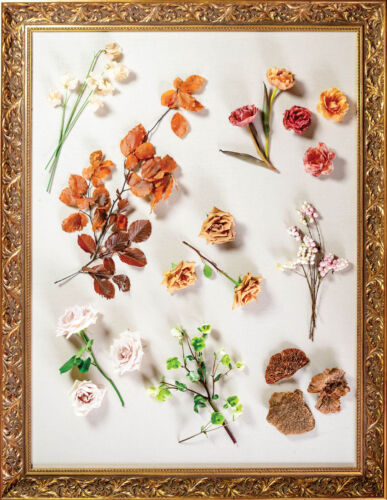
When it comes to creating fall arrangements, Maria Maxit of Maxit Floral Design is not afraid to admit that sometimes she gets a little spooked. “Most often, when we think of fall flowers, we think of oranges, yellows, and reds— colors that seem to go with Halloween. But none of these are my personal favorites,” she says. “For this arrangement, I wanted to embrace the softer side of the season by capturing the transition that occurs between summer and fall. To do this, I integrated some unexpected pastels into the mix like green hellebores and pink snowberry. They lighten the weight of the brown tones and darker colors to add a sense of freshness and serenity.”[/vc_column_text][/vc_column][/vc_row][vc_row][vc_column][vc_column_text]
Behind the Scenes
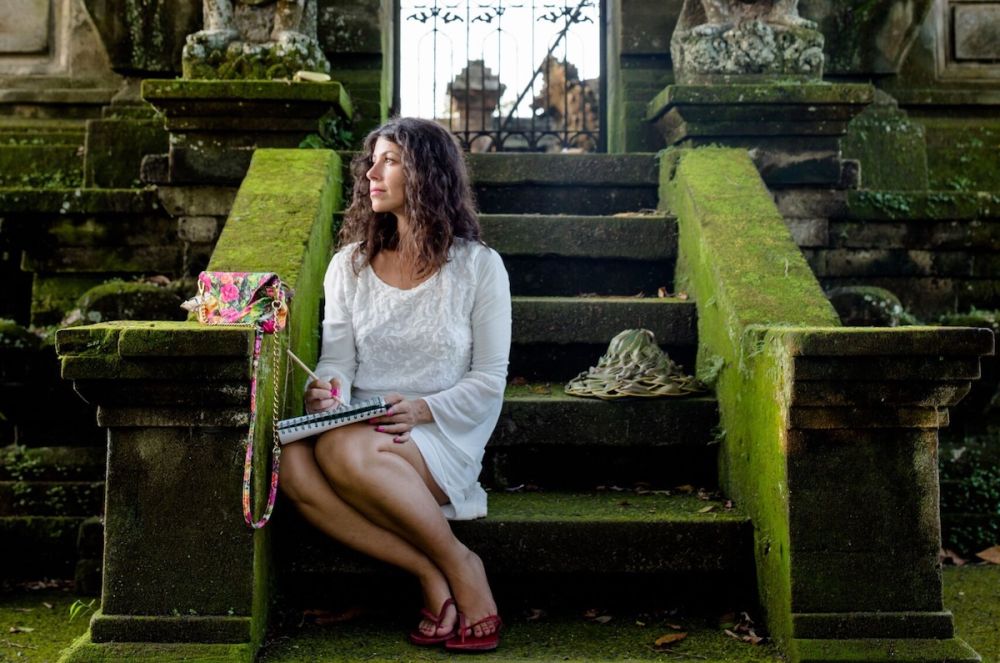
Maria doesn’t remember a time when flowers weren’t a part of her life. “My mother had a rose garden, and my father was passionate about taking care of it,” she says. “Those blooms, as well as other types of flowers, practically took over my childhood home. But I never imagined that flowers would, or even could, impact my adult life the way they have.” Twenty years ago, she left the hustle and bustle of corporate America in search of greener pastures and took a part-time job at her favorite local flower shop. While her stint there was temporary, it solidified her desire to turn her love of flowers into a profession. Since founding her eponymous firm in 2010, Maria has grown Maxit from designing flowers for intimate weddings and social gatherings in her hometown of Houston to developing extravagant floral installations for corporate events all over the world. But for Maria, there is more to growth than just numbers. “My designs are constantly evolving because I am driven by a desire to try something ‘new,’ ” she says. “I love learning, traveling, and simply experiencing all the beauty that life has to offer. The more I do, the more inspired I become. The greatest thing about the creative process is that it’s ever-changing.”[/vc_column_text][/vc_column][/vc_row][vc_row][vc_column][vc_column_text]
Materials
[/vc_column_text][/vc_column][/vc_row][vc_row][vc_column width=”1/3″][vc_column_text]
- Coated chicken wire
- Waterproof floral tape
- Clippers
[/vc_column_text][/vc_column][vc_column width=”1/3″][vc_column_text]
- Preserved Copper beech
- Toffee roses
- Quicksand roses
[/vc_column_text][/vc_column][vc_column width=”1/3″][vc_column_text]
- Caramel tulips
- Brown sweet peas
- Green hellebores
- Snowberries
[/vc_column_text][/vc_column][/vc_row][vc_row][vc_column][gem_quote]“It’s not just the rich colors but also the rich textures that give this arrangement a rustic nature that translates into a ‘fall’ aesthetic.” —MARIA MAXIT[/gem_quote][/vc_column][/vc_row][vc_row][vc_column][vc_single_image image=”261347″ img_size=”large” alignment=”center”][/vc_column][/vc_row][vc_row][vc_column][vc_column_text]
STEP 1
Form the base of the arrangement by mounding coated chicken wire inside the vessel. Hold the wire mound in place by topping it with an X made from waterproof fl oral tape. Fill with water about one inch at the top.[/vc_column_text][/vc_column][/vc_row][vc_row][vc_column][vc_single_image image=”261348″ img_size=”large” alignment=”center”][/vc_column][/vc_row][vc_row][vc_column][vc_column_text]
STEP 2
Working from the outside in, insert the Copper beech branches in a grid to help shape the arrangement. Do not overstuff. The Copper beech should take up of the vessel, leaving for the florals.[/vc_column_text][/vc_column][/vc_row][vc_row][vc_column][vc_single_image image=”261349″ img_size=”large” alignment=”center”][/vc_column][/vc_row][vc_row][vc_column][vc_column_text]
STEP 3
Anchor the arrangement with focal flowers starting with the Toffee roses followed by the Quicksand roses. Insert them as clusters, and then stack them by color. Add brown tulips.[/vc_column_text][/vc_column][/vc_row][vc_row][vc_column][vc_single_image image=”261350″ img_size=”large” alignment=”center”][/vc_column][/vc_row][vc_row][vc_column][vc_column_text]
STEP 4
Add groupings of more delicate accent flowers starting with the sweet peas followed by the hellebores and snowberries.[/vc_column_text][/vc_column][/vc_row][vc_row][vc_column][vc_single_image image=”261351″ img_size=”large” alignment=”center”][/vc_column][/vc_row][vc_row][vc_column][vc_column_text]
STEP 5
Check all sides of the arrangement and fill in as needed.[/vc_column_text][/vc_column][/vc_row][vc_row][vc_column][vc_single_image image=”261352″ img_size=”large” add_caption=”yes” alignment=”center”][/vc_column][/vc_row][vc_row][vc_column][vc_separator][/vc_column][/vc_row][vc_row][vc_column][vc_column_text]Produced by Margaret Zainey Roux
Photography by Ellen Renee
See more from Maxit Flower Design by visiting their website and following along on Instagram.
See another arrangement how-to from Maria in bold greens and purple tones.[/vc_column_text][/vc_column][/vc_row]